These groups are some of the most important, and also the groups that users will be placed into automatically upon registration / upload / expiry.
Default User Groups Breakdown
Those in blue will only appear if you have University Email selected, or the Volunteering Module included in your package
| Name | Description |
|---|---|
Activated Students | This group is empty by default, and you can't upload users to it, Confirmed Students, move to this group, after logging in for the first time. |
Administrators | This is the Default Union Administrator group, who have permissions to manage all website content. |
Alumni | This group is empty by default, but once a users course date expires, they move out of Confirmed Students, and into Alumni. |
Confirmed Students | This group is populated by data upload, and is the group of students that you are confirming you know are students, this can then be used for elections etc. |
Deleted Students | This group is for users that have requested to be removed from the system, it excludes them from all comms, records, reports etc. They remain in this group as there is still content linked totheir accounts from previous purchases and the like, in case this ever needs reporting on. |
Non Students | This group is populated by anybody that registers with a non-university email address and can't confirm they are a student. |
Students | This group is populated by all users who register with the domain you set for your institution (usually x-universitycollege.ac.uk) plus anyone in the 'Confirmed Students' Usergroup. |
Students Waiting for University Email Access | If you have checked the box indicating registration has to be done via university email address, and a user indicates they don't have access to it pre-arrival, they will be added to this list, allowing them to register with a personal email address also, and merge their accounts once they have access. |
Volunteering Organisations | If you have the Volunteering Module included in your package, you will have this option, when new Volunteering Organisations register, to list opportunities, then a Volunteering Administrator will need to approve them in the Volunteering Dashboard, then they will be added to this group, and be given permissions to manage Volunteering Opportunities. |
Volunteering Students | Any student who has signed up to the Volunteering module will be added to this group, as it is confirming the group of students who have registered their interest to volunteer, and listed the areas they are interested in / skills they have. |
Other Features within Union subsection
Show Count
Simply click this to show how many users are in each group.
View User Group
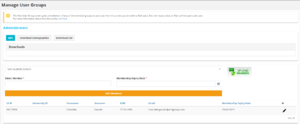
This screen gives you an overview of an individual User Group, at the top you can see the title of the group you are in, highlighted with a blue font.

Adding New Users
1. Manually
You can add users manually using the three boxes under the group title, the method is as follows;
- From the drop down list, choose a group you know the user is already a member of
- Search for the user by their name, it will return to you close matches, and Dates of Birth to allow you to check you have the right person
- Choose a membership expiry date for the user, this should be a year or so, and checked regularly to ensure there are no dormant accounts with permissions they shouldn't have.
- Select the 'Add members' button to finish the process.
2. CSV Upload
This is the same as in the User Group Member Upload section below, there are just two places you can select this option.
Filter / Sort Users

The header row of the table, with the darker grey background is of much use, particularly when you are dealing with groups containing thousands, or even tens of thousands of users. You can both filter and sort any users in this table, and it also allows you to filter by multiple fields, and use part matches. You can click any of the Column headings to sort (ID, University ID, Forename, Surname, DOB, Email Membership Expiry Date), primarily it will sort (A-Z) in field which can contain strings, and (0-9) in a field that contains numeric values, however if you click the heading a second time, it will filter this to the reverse.
With regards to filtering, this works almost the same, to make the filter section appear, all you need to do is click the small cocktail glass symbol in the far right hand column, and it will reveal the menu as pictured above. You can filter by any of the same fields as outlined above, with the exception of Membership Expiry Date, and the only filter that works differently is Date of Birth, this filter gives you two calendar options, Start and End, which will return all user whose DoB falls within the range.
Finally, there are two buttons below the filter button, one to reset your filters, and another to apply the filters you have just typed in the fields, alternatively you can press return on the keyboard to update.
Note: Remember, you can use multiple filters AND sort in conjunction with each other, particularly useful if you are looking for someone with a common name!

Edit a Users Expiry Date
Editing a users Expiry date requires the user to click the Edit button, in the far right hand column, this will take you to the screen pictured in the thumbnail above where you can use the calendar to pick a new expiry date for the user, and then simply click the 'Edit Expiry Date' button, and you're done!
Edit
The Edit button at the bottom of this page takes you to the same page as the edit button before you click into a specific user group.
Download Demographics
After clicking the Download Demographics button, a timing icon will appear in the Downloads section at the bottom of the page. This usually takes a few seconds, but under peak times and heavy usage could take up to a minute or so, for the site to gather the data, and present you with a PDF to download.
You will be presented with a two page document containing the Demographic data for all members within the group you are currently managing.
Download CSV
The final option within the View Usergroup screen is to Download a CSV of the group members, this downloads data on all of the users in the current group you are managing, in CSV Format, the data also matches the format used in the Student Upload file, so you will be getting Nationality, CourseID, StudentID, etc.
Edit User Group

The Edit page is where it gives you the options to;
- Rename
- Update Description For
- Change Permission Set
User Group Member Upload

It doesn't matter which method you use to select the User Group Member Upload Option, the small CSV Upload button on the right-hand side of the 'User Groups & Permissions' screen, or the View User Group Option, which you get to by selecting the View button on the right-hand side next to any of the user groups, to get the more detailed view for a particular user group, and a list of its current members, then there is a large, 'Upload Members' Button on the right hand side.
Once the pop up appears you are presented with a number of options.
- Choose File button, to upload a CSV
- A Checkbox to add users for e-voting
- An icon to the right to 'Download Sample CSV Template'
- And two notifications, which we will clarify here;
- 'Email and Expiry Date can't be blank' (For e-voting users forename and surname are also mandatory)
- Email and Date of Birth are the required fields that UnionCloud uses to find a user in the database and add them to the correct user group
- 'File processing is a scheduled background activity.
- All files you upload will be processed at midnight local time, this is because processing large quantities of database puts an increased load on the server and to do it at peak time would cause an increase in page load times and a poorer experience for all members. Please bear this in mind when you need to upload Member files.